Are you looking to transition from HoneyBook to Bloom? Whether you’re seeking a more streamlined user experience, advanced features, or better support for your freelance business, making the switch can feel daunting. But don’t worry — this guide will walk you through the process step-by-step to ensure a smooth transition.
Why Switch to Bloom?
Bloom is a comprehensive CRM tailored specifically for creative freelancers. Here are a few reasons why many users choose Bloom:
- User-Friendly Interface: Simplify your workflow with an intuitive design.
- Complete Client Experience: Unlike other CRM’s, Bloom includes chat messaging, client portals, and asset delivery.
- Built-in Marketing Tools: From email campaigns to lead capture, grow your business seamlessly.
- Affordable Pricing: Bloom offers competitive plans with no hidden fees.
- Exceptional Support: Get quick, personalized assistance whenever you need it.
Now, let’s dive into how you can make the switch.
Step 1: Export Your Data from HoneyBook
Thankfully Honeybook has some exporting tools that can make the switch quick and easy. Start with exporting your contacts, that way when you setup your projects you can quickly add the existing contacts.

- Log in to HoneyBook: Access your account and navigate to the “Clients” section.
- Download Your Contacts: Export your client list through the additional options dropdown.
- Download Project Reports: Honeybook gives you the ability to download many reports. Since you’ll be cancelling your Honeybook account, it’s a good idea to download all of your project data to have available for your records. When it comes to migrating, you’ll only need your current “active” projects.

Pro Tip: Double-check that all your files have been exported successfully before proceeding.
Step 2: Set Up Your Bloom Account
- Sign Up for Bloom: Create your account by visiting Bloom and selecting a plan that fits your needs.
- Customize Your Brand: Add your branding elements, including your logo and colors, to give your account a personal touch.
- Familiarize Yourself with the Dashboard: Spend a few minutes exploring Bloom’s interface to get comfortable with the platform.
Step 3: Import Your Data into Bloom
- Upload Client Information: Use Bloom’s data import tools to add your client details and projects.
- Navigate to the “Contacts” section to import your client list.
- Use the “Projects” feature to recreate ongoing work.
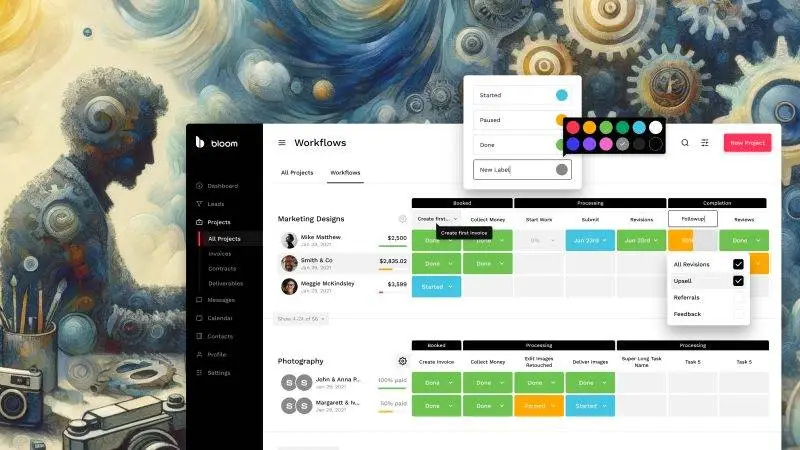
- Recreate Workflows: Set up Bloom workflow milestones that mirror your previous HoneyBook “Steps”.
- Update Lead Capture Forms: If you use Honeybook forms to capture leads from your website, you will need to recreate the form in Bloom and embed the code into your website. This is easily done by navigating to your Lead Forms page and creating a new lead form with the same questions that you already have on Honeybook. Once your new form is built and stylized correctly, replace the code and your website will now send new leads to your Bloom portal.
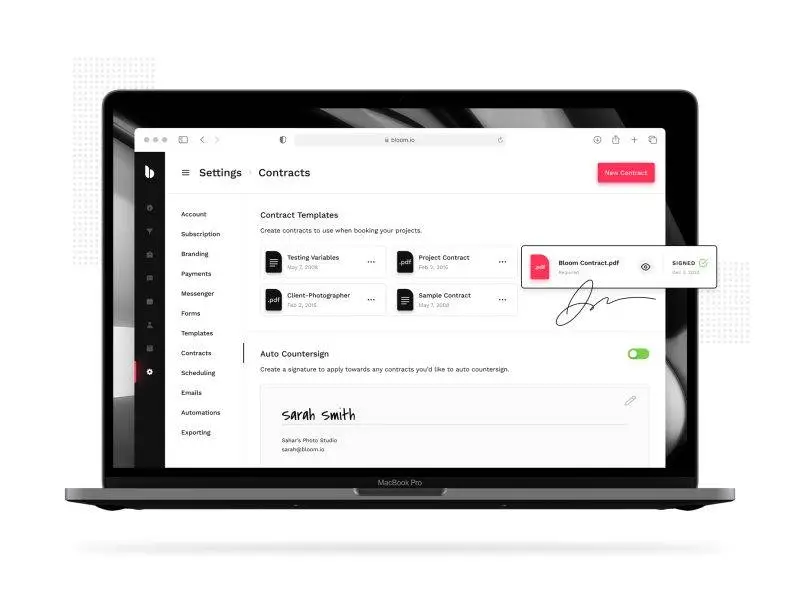
Step 4: Transfer Contracts and Templates
- Upload Contracts: Copy your existing contracts into Bloom’s contract editor. Bloom allows you to either upload a PDF contract or copy and paste your contract. You can also recreate all of the same dynamic variables as needed.
- Migrate Templates: Recreate your email and invoice templates in Bloom’s system. This is a good opportunity to do “Spring Cleaning” and migrate only the templates that you actually use.
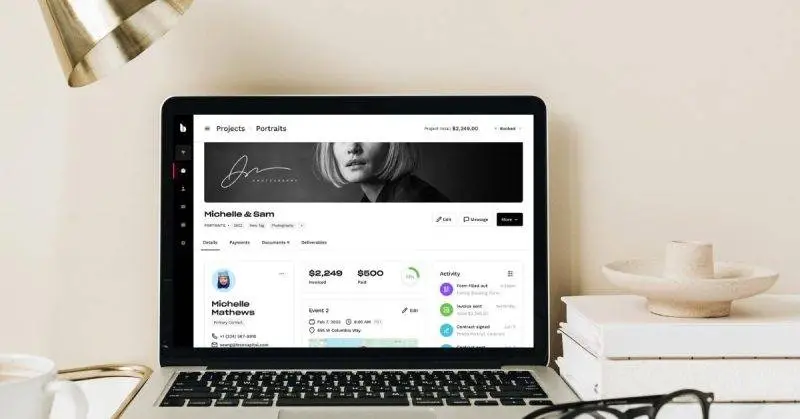
- Add Active Projects to Bloom: Once your setup is complete, you can now add your active projects to Bloom. When switching over, add the project name, notes, details, files, or any other relevant information. You can create as many custom Notes or Uploads in Bloom to add Honeybook project details, including email communication and signed contracts.
Step 5: Notify Your Clients
Once this setup is complete, you’re now ready to notify your existing clients about your platform switch. Here is a sample email you can write to notify your clients:
Here’s a more polished version of your email:
Subject: Exciting Update!
Dear [Client Name],
I’m committed to providing you with the best possible service, and I’m excited to share a recent update that will enhance the our collaboration moving forward. I’ve transitioned to a new CRM and client management platform, Bloom, which offers a streamlined and centralized approach to managing project documents and communication.
Soon, you’ll receive a login to your personal client portal. Through this portal, you’ll have easy access to all project details, updates, and communication in one convenient place.
If you have any questions or need assistance with the portal, please don’t hesitate to reach out—I’m here to help!
Looking forward to continuing our work together.
Yours truly,
[Your Name]
And now you’re ready to send client portal invitations.
- Update Your Communication: Inform your clients about the switch to Bloom and let them know what to expect.
- Send a professional email explaining the benefits of the new platform.
- Share new links or forms if applicable.
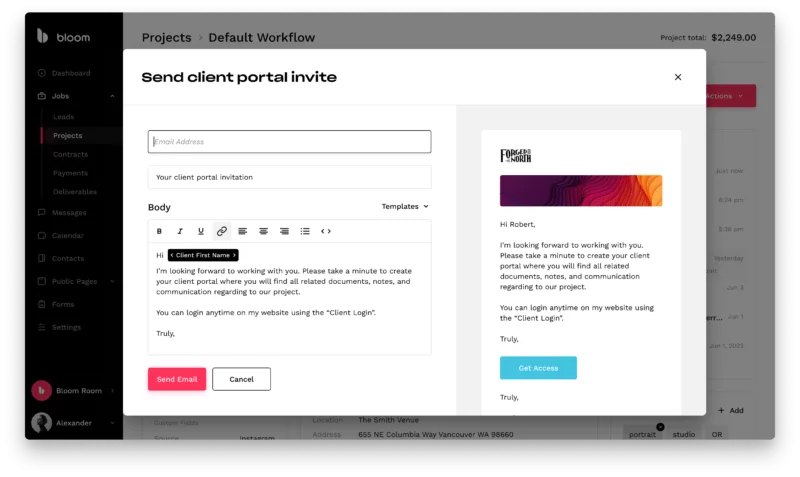
- Send client portal invites: Once you notify your clients about the platform change, you can now send active projects invitations from your project page. This is extremely easy to do in Bloom. On your project details page, find your contact card and click on “Send client portal invite”.
For some projects, you might want to consider finishing in Honeybook and overlapping the two platforms for several months to ensure a smooth transition. Start by entering new projects into Bloom, and once you’re comfortable, transition all the old ones from Honeybook also.
Step 6: Close Your HoneyBook Account (Optional)
- Verify Data Transfer: Ensure all your data has been successfully moved to Bloom.
- Cancel Your HoneyBook Subscription: Log in to your HoneyBook account and follow the cancellation process to avoid further charges.
When you cancel a Honebook subscription, there is no need to delete it. All of your client data will continue to live there just in case you need to return back to it for reference.
Ready to Bloom?
Switching to Bloom doesn’t have to be complicated. By following these steps, you’ll be up and running in no time, with tools that will help you grow and manage your creative business more effectively. Start your Bloom journey today and experience the difference!
Have questions about the transition? Contact our support team for personalized assistance.